
Ritesh Nayak
Notion Developer
Best Practices for Sharing Client Documents in Notion
•
12
Sharing client documents securely in Notion is essential for maintaining trust, safeguarding sensitive information, and ensuring compliance with regulations like HIPAA or PCI DSS. Here's how to do it effectively:
Organize Client Hubs: Use private teamspaces and structured page hierarchies to keep internal and client-facing documents separate.
Set Permissions Wisely: Assign clients as Guests with limited access levels (e.g., "Can View" or "Can Comment") to protect sensitive data.
Centralize Data: Use master databases for records like projects, meeting notes, and deliverables, with filters to show clients only relevant information.
Secure Sharing: Always disable public links and share pages directly with invited users. Regularly audit permissions to avoid accidental access.
Archive and Maintain: Move completed projects to an archive and conduct quarterly audits to keep your workspace secure and organized.
Whether you’re managing a few clients or many, these steps will help you stay organized, compliant, and efficient. Start small by implementing one or two of these practices, and expand as your needs grow.
How to Manage Clients in Notion
How to Structure Client Document Hubs in Notion
Keeping your client document hub organized is essential to avoid confusion and safeguard sensitive information. A well-thought-out structure ensures internal work remains separate from client-facing documents, while remaining scalable as your needs grow. Let’s dive into some practical ways to set up a client document hub in Notion.
Creating Dedicated Teamspaces and Pages for Clients
Notion provides three types of teamspaces: Open (accessible to anyone who joins), Closed (visible but requires an invite), and Private (hidden from non-members). For client work, private team spaces are your best bet for maintaining strong security boundaries. These are available on Notion's Business and Enterprise plans, offering advanced protection for sensitive data.
When inviting clients into your workspace, always add them as Guests rather than full members. This ensures they only see the specific pages you share with them, keeping your internal operations completely separate.
Building a Clear Page Hierarchy
Start by creating a top-level client wiki that serves as the main homepage for each client. Under this parent page, organize all related documents - like contracts, project specs, communication guidelines, and deliverables - as subpages. This method keeps your sidebar neat and leverages permission inheritance: when you share the top-level wiki with a client, they automatically gain access to all nested subpages unless you adjust permissions manually.
If you’re managing multiple clients, set up distinct top-level pages for internal resources (e.g., employee directories or HR information) and separate pages for each client. To maintain consistency, use database templates for recurring documents like creative briefs or project proposals. Keep internal drafts in the "Private" section of your sidebar before moving finalized versions to the shared client wiki.
Using Notion Databases for Client Records
Centralize all client-related information by using master databases. Create dedicated databases for key areas like Projects, Meeting Notes, and Resources. Then, embed Linked View of Database blocks on each client’s homepage to display filtered views that show only the records relevant to them. This keeps your internal data centralized while presenting clients with a tailored dashboard.
Enhance your databases by adding properties to track important details like Status (Select), Deadlines (Date), Project Owner (Person), and Priority (Number). Use Relation properties to link databases - for example, connecting your Meeting Notes database to your Clients database so all interactions appear on the client’s main record. On Business and Enterprise plans, you can enable page-level access rules based on a Person property, automatically restricting database entries so clients see only the records where they’re tagged.
Setting Up Permissions and Access Controls
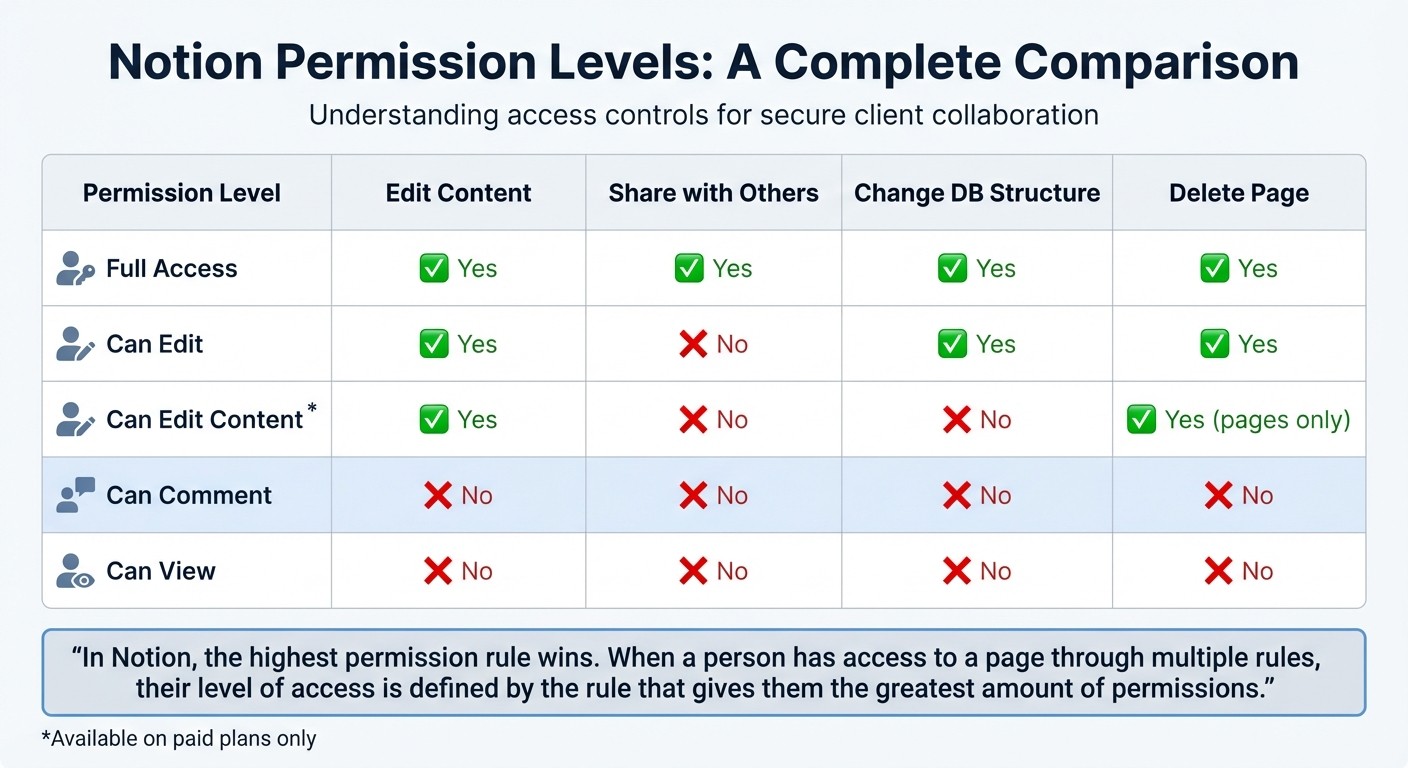
Notion Permission Levels Comparison Chart for Client Document Sharing
Managing permissions effectively is key to ensuring secure collaboration with clients in Notion. Understanding the platform's access levels helps prevent accidental exposure of sensitive information.
Notion's Permission Levels Explained
Notion offers five distinct access levels, each designed for different collaboration scenarios. Here's a breakdown:
Full Access: Grants complete control, including editing content and sharing pages. This level should rarely, if ever, be given to clients.
Can Edit: Allows users to edit content but restricts their ability to share pages. This is ideal for active collaboration on projects.
Can Comment: Limits users to viewing pages and leaving feedback without altering the original content, making it perfect for review processes.
Can View: Provides read-only access, suitable for sharing final deliverables or reference materials.
Can Edit Content: Available on paid plans, this is specific to databases. It allows clients to make updates or add tasks without risking the deletion of important properties or views.
As Thomas Frank explains:
In Notion, the highest permission rule wins. When a person has access to a page through multiple rules, their level of access is defined by the rule that gives them the greatest amount of permissions.
For example, if a client is individually granted Can View access but the page is shared publicly with Can Edit permissions, the client will ultimately have editing rights.
Permission Level | Edit Content | Share with Others | Change DB Structure | Delete Page |
|---|---|---|---|---|
Full Access | Yes | Yes | Yes | Yes |
Can Edit | Yes | No | Yes | Yes |
Can Edit Content | Yes | No | No | Yes (pages only) |
Can Comment | No | No | No | No |
Can View | No | No | No | No |
How to Share Pages Safely with Clients
To ensure secure sharing, start by building your client portal in the Private section of your sidebar. This keeps it hidden until you're ready to share. When inviting clients, use their email addresses to add them as Guests rather than workspace members. Guests can only access pages they are explicitly invited to, which helps maintain the privacy of your internal operations.
Set "General access" to Only people invited to prevent the page from being searchable or accessible via a shared link. For users on Business or Enterprise plans, database-level permissions can be enabled to restrict access further. This ensures clients only see records where they are specifically tagged in a Person property.
Using Permission Inheritance to Protect Sensitive Information
Notion's permission inheritance system simplifies management but requires careful handling for sensitive content. By default, subpages inherit the permissions of their parent page . While this is efficient, overrides are necessary for confidential documents.
To restrict access to sensitive subpages, open the "Share" menu of the specific page and adjust the client's access to No Access. This breaks the inheritance chain for that page alone. For example, you might provide Can View access to a project folder while restricting access to an internal strategy document nested within it.
On Business and Enterprise plans, database page-level access rules can automatically hide records based on Person properties. This provides row-level security without requiring manual adjustments for each entry.
Organizing Client Documents for Easy Access and Compliance
A well-structured document system is more than just tidy - it’s a cornerstone of both efficiency and compliance. How you name and organize files directly affects how quickly your team can find what they need and whether you meet U.S. compliance standards. It all starts with consistent naming conventions.
Document Naming Conventions That Work
Clear and consistent naming makes it easier to locate documents at a glance. Ben Borowski from Notion Mastery highlights this point:
Notion operates most effectively when you have a reliable schema for naming resources.
A useful format to follow is: [Client Name]: [Document Type] - [MM/DD/YYYY]. Use Title Case to make names easier to scan quickly. For databases, stick to pluralized names like Invoices to indicate collections. To make templates stand out in search results, prefix them with symbols like → or labels such as [TEMPLATE]. When naming database properties, avoid generic terms like "Date." Instead, use more specific descriptors like Due by or Scheduled at to clarify their function.
Once you’ve nailed down consistent naming conventions, centralize everything in structured databases for easier management.
Managing Documents with Databases
A centralized "Docs" database can house contracts, invoices, and deliverables, making it simple to track and manage client documents. Add properties such as category selectors, deadlines, and assignees for better organization. Use Relation properties to link these documents to a master Client Database, giving you a full overview of all client interactions in one place.
Saved views like Overdue Tasks or Unpaid Invoices can help you quickly access important records. For compliance purposes, remember that U.S. regulations often require financial documents to be retained for 7 years. Enterprise users can even implement custom data retention policies, keeping deleted pages in a "retained" state for up to 10 years to meet standards like HIPAA for healthcare or GLBA for finance.
Using Templates for Consistent Client Portals
Database templates are a game-changer for maintaining consistency across client portals. Pre-built templates for recurring document types - such as creative briefs, project proposals, or onboarding checklists - save time and ensure uniformity.
For example, Sentele provides ready-made Notion templates that simplify client portals and document workflows. These systems not only standardize processes but also make it easier to manage client interactions without reinventing the wheel each time.
Keeping Client Portals Secure and Organized
Setting up a client portal is just the beginning. Over time, access permissions can shift, old projects can pile up, and compliance issues may arise. Regular upkeep is essential to keep your client portals efficient and secure while safeguarding sensitive data.
Conducting Regular Permission Audits
Make it a habit to conduct quarterly audits of who has access to your pages. Carefully review all permission settings to ensure no client accidentally gains higher access levels than intended.
Check the Guests tab to see a complete list of external users and the specific pages they can access. You can double-check these permissions by clicking on profile avatars in the Share menu. To confirm what an unauthenticated user might see, paste the sharing link into an incognito browser window for a quick test.
It’s also a good idea to remove inactive guests regularly. This helps you stay within plan limits (the free plan allows up to 10 guests) and reduces potential security vulnerabilities. For Business and Enterprise accounts, take an extra step by reviewing page-level access rules in databases. This ensures clients only see their own records. Additionally, enabling "Guest requests" in Security settings prevents members from inviting external users without admin approval.
Once you’ve completed your permission audits, shift your attention to organizing and archiving completed projects.
Archiving Completed Client Projects
After auditing permissions, archiving finished projects is a great way to keep your workspace tidy and manageable.
Set up a dedicated Archive page at the top level of your workspace. Organize sub-pages by year or project type (e.g., Archive > 2024 > Client Name). Use the "Move to" function to relocate completed projects out of your active workspace.
If you rely on databases, add a Status property with options like Active, Paused, and Completed. Filter your views to hide completed projects from your daily dashboard while keeping them accessible in a separate Archive view.
For added convenience, consider using Notion AI (available for $8 per month per user when billed annually) to create summaries of completed projects before archiving them. This makes it easier to revisit project details later without digging through extensive documentation. Remember to align your archiving practices with U.S. legal requirements, such as retaining financial records for seven years.
Creating Audit-Ready Processes
Beyond managing permissions and archiving, establishing audit-ready workflows is key to maintaining security and compliance.
Assign ownership using "Person" properties to ensure accountability for each task or section. Use database templates to standardize client portals, reducing errors and maintaining consistency.
For Enterprise users, regularly export audit logs (stored for up to 365 days) and restrict high-risk actions. For example, disable public sharing, guest invitations, and exports to minimize potential risks. Notion is certified for SOC 2 Type 2, ISO 27001, and other international standards, with a Recovery Time Objective (RTO) of 2 hours and a Recovery Point Objective (RPO) of 24 hours.
When working with shared databases across multiple clients, use Advanced Filters in linked views. This ensures that each client sees only the data relevant to them.
For added convenience, explore Sentele’s Notion templates to simplify portal security and audit processes. These templates can save time and help you stay organized while ensuring compliance.
Conclusion
Sharing client documents in Notion doesn’t have to be complicated. By inviting clients as guests with "Can Comment" or "Can View" permissions and organizing portals around a central database, you can create a scalable and secure system for collaboration. These initial steps set the stage for seamless and safe client interactions.
As Lee Giles, Design Lead at MetaLab, explains:
Notion creates a great opportunity for us to make workflow collaboration two-way between us and the client.
This level of collaboration thrives when your setup is both secure and well-organized.
But remember, the work doesn’t stop after the initial setup. Regular maintenance is key. Perform quarterly audits, archive completed projects, test your portals in incognito mode to check permissions, and remove inactive guests - especially if you’re working within the free plan’s 10-guest limit.
The strategies outlined in this guide - from building structured page hierarchies and database-centered portals to managing permissions and creating audit-ready workflows - combine to form a system that balances security with efficiency. Start by adopting one or two of these practices, and expand as your client list grows.
If you’re looking for a head start, Sentele’s Notion templates offer a quick way to create polished, professional client portals without starting from scratch. Whether you’re managing a handful of clients or dozens, these practices will help you stay organized, safeguard your data, and instill confidence in your clients.
FAQs
How can I make sure client documents in Notion comply with HIPAA regulations?
To keep client documents in Notion compliant with HIPAA, you'll need to opt for their Enterprise plan and sign a Business Associate Agreement (BAA). This agreement ensures the proper handling of Protected Health Information (PHI) and is a key requirement for meeting HIPAA standards. After securing the BAA, enable Notion’s HIPAA compliance settings in your workspace to activate features like encryption, audit logging, and access controls.
Pay close attention to sharing permissions. Limit access to only those team members or external collaborators who truly need it, and assign the most restrictive access level possible - like Can view instead of Can edit. Avoid public sharing, turn off unnecessary integrations, and routinely review permissions to prevent unauthorized access.
Organizing PHI effectively is also crucial. Use dedicated templates with preset access controls, require multi-factor authentication for all users, and schedule regular audits to maintain compliance. These practices will help you manage client documents securely in Notion while meeting HIPAA standards.
How can I regularly review and update permissions for client documents in Notion?
To keep your client documents secure in Notion, it's essential to stay on top of permissions and access levels. Start by heading to your workspace’s audit log. This tool lets you review recent changes, like who’s been added or removed and any updates to access permissions. Use the filtering options to zero in on events tied to permissions, and keep an eye out for anything unusual. If needed, you can export the log for compliance or reporting purposes.
Next, take a closer look at the Share menu for each client-facing page. This menu shows who currently has access and their permission levels, such as Full Access, Can Edit, or Can View. If you spot any outdated or unnecessary access, you can adjust roles or remove permissions directly from there. To stay ahead, consider setting a recurring reminder - weekly or monthly - to review these settings. Regular audits like this help ensure that only the right people can access sensitive client information.
How can I securely share client documents using Notion's private teamspaces?
To securely share client documents in Notion, start by creating a Private Teamspace. This allows you to control access and protect sensitive information. Open the Teamspaces panel in the left-hand sidebar and click + New Teamspace. Choose a clear, client-specific name like "Acme Client Portal" and set the visibility to Private, ensuring only invited members can access it.
Next, invite your client as a guest with either "Can view" or "Can comment" permissions, depending on their level of involvement. For internal team members managing the portal, assign Full access. Double-check page-level permissions within the Teamspace to ensure everyone has the appropriate access. Once everything is configured, lock the Teamspace to prevent any unauthorized changes.
To save time and keep things organized, you might want to use a pre-designed client portal template from Sentele. These templates make it easy to structure contracts, deliverables, and other important documents while maintaining a secure and efficient setup.
Ritesh Nayak
Ritesh Nayak
Ritesh Nayak
Ritesh Nayak
Ritesh Nayak