
Ritesh Nayak
Notion Developer
Complete Checklist: Setting Up Notion for Your Business
•
14
Notion can simplify your business workflows by consolidating tools, documents, and tasks into one workspace. This guide walks you through everything you need to set up Notion for your team, from choosing the right plan to creating custom dashboards and linking databases. Here's what you'll learn:
Prepare Your Workspace: Identify your business needs, select a Notion plan, and configure access for team members.
Organize Teamspaces and Databases: Create spaces for departments, set up key databases (e.g., Projects, Tasks), and link them for seamless workflows.
Customize Dashboards: Build a central homepage with project updates, KPIs, and quick links for easy navigation.
Secure and Test Your Workspace: Lock sensitive pages, test workflows, and ensure everything runs smoothly.
Maintain and Scale: Regularly review your setup, update content, and adjust for team growth.
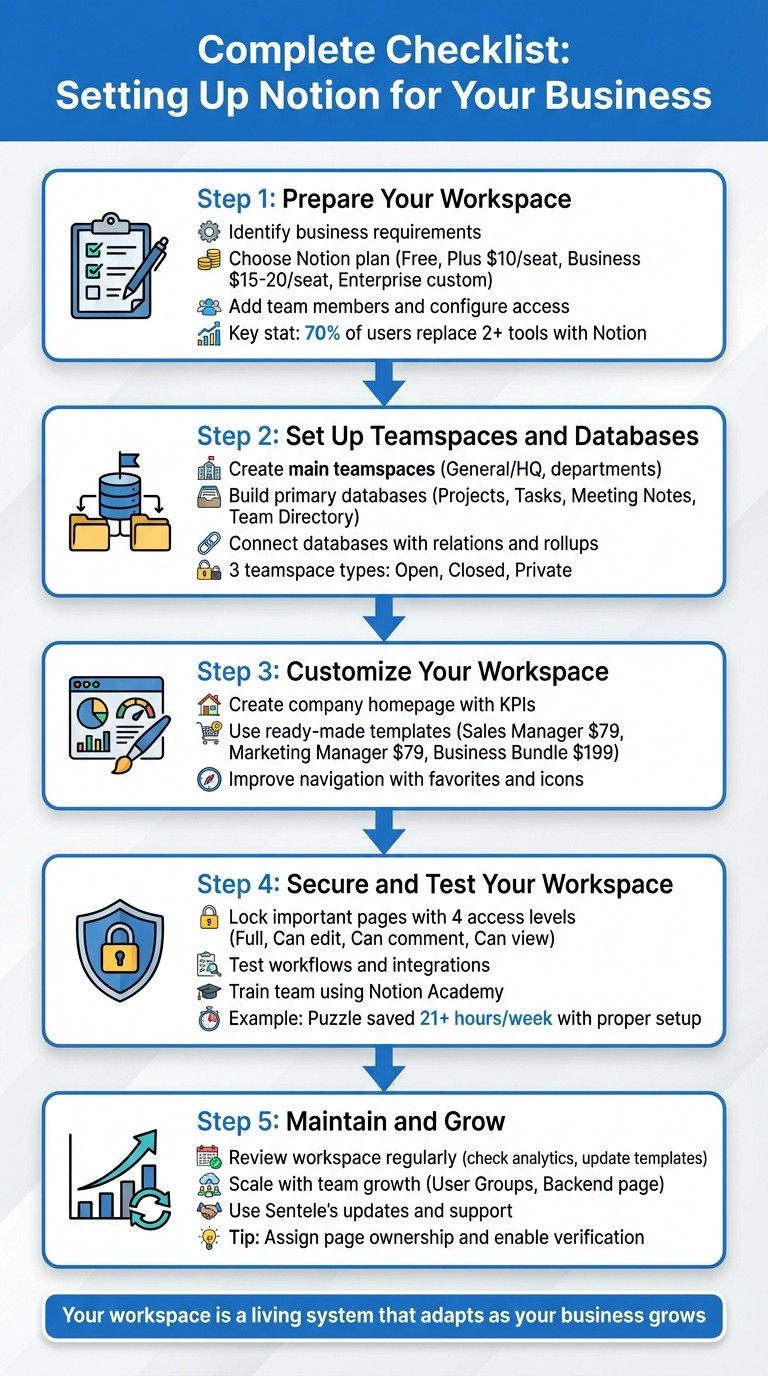
5-Step Notion Workspace Setup Process for Business Teams
Step 1: Prepare Your Notion Workspace

Identify Your Business Requirements
Before diving into building pages, take a step back and figure out what your business actually needs. Are you organizing content by department, cross-functional teams, or individuals? This decision shapes how you'll structure your workspace.
Think about how you'll use Notion. Will it be for project tracking, creating a company wiki, managing client relationships, or storing documentation? For example, if you need to track how ideas move from triage to design and development, you'll want a workflow that mirrors those exact stages.
Next, consider which tools Notion will replace or integrate with. For instance, many users transition from tools like Slack, GitHub, or Google Drive. In fact, 70% of Notion users end up replacing two or more tools. Also, take a close look at your security needs. Decide who needs full access versus view-only permissions, and whether you'll require Enterprise-level features like SAML SSO for added security.
Start with a "Backend" page to keep things tidy. This page should house all your core databases (like Tasks, Projects, and Docs) in one private spot. It’s also smart to set up user groups early on - creating a "Marketing Group", for example, makes managing permissions much simpler than adding users one by one.
Choose and Sign Up for a Notion Plan
Pick a plan that matches your team size and feature needs. If you’re a solo entrepreneur, the Free plan might work, but keep in mind it limits workspaces with multiple members to 1,000 blocks. For small teams, the Plus plan ($10 per seat per month billed annually) removes block limits and file upload restrictions, making it a solid choice.
As your team grows, you’ll likely need the Business plan, which costs between $15 and $20 per seat per month (billed annually). It includes private teamspaces, SAML SSO, and a 90-day page history. Larger organizations with more complex security needs - like SCIM provisioning or audit logs - should look into the Enterprise plan, which offers custom pricing.
To save about 20%, opt for annual billing instead of monthly payments. If you’re a startup with fewer than 100 employees, Notion may offer 3 to 6 months free on the Business plan, complete with Notion AI. Students and educators can also access the Plus plan for free by verifying their school email.
Once you’ve chosen your plan, you’re ready to invite your team and set up permissions.
Add Team Members and Configure Access
With your workspace up and running, the next step is to bring your team on board. You can invite them via email, a secret invite link, or by enabling Allowed Email Domains so anyone with your company email can join automatically - a great option for fast-growing teams.
Be cautious when assigning roles. Workspace Owners have full control over settings and billing, so limit this role to a trusted few. Membership Admins can handle member invites and removals but can’t change workspace-wide settings. Standard Members, meanwhile, can create and edit pages without having administrative privileges.
For external collaborators, Guest access is your best bet. Guests can only see the specific pages you share with them, keeping the rest of your workspace private. If your team is large, organize users into permission groups (like Marketing or HR) to manage access more efficiently. And don’t forget to check the Guests tab regularly to revoke access for contractors or collaborators who no longer need it.
Step 2: Set Up Teamspaces and Databases
Set Up Your Main Teamspaces
Start by creating a General or HQ teamspace to house company-wide essentials like mission statements, core values, and meeting notes. This serves as the go-to hub for employees when they log into Notion, offering a clear starting point.
Next, set up teamspaces for specific departments such as Marketing, Engineering, Sales, Product, and Operations. You can also create additional teamspaces tailored to projects, specific teams, or even geographic locations if needed.
"Teamspaces give you more customizability and control over access levels to content, functioning like smaller workspaces within your workspace." - Notion
For sensitive areas like HR, Finance, or leadership, use closed or private teamspaces to maintain confidentiality. Notion allows you to choose between three types of teamspaces:
Open: Visible and accessible to everyone.
Closed: Visible but requires an invite to join.
Private: Only visible to members.
To keep the sidebar organized, you can restrict teamspace creation to workspace owners. For new hires, set only 1–3 default teamspaces containing the most essential content they’ll need. This helps streamline their onboarding process and avoids overwhelming them with unnecessary information.
Once your teamspaces are in place, you can move on to building the databases that will drive your workflows.
Create Your Primary Databases
Establish key databases like Projects & Tasks, Meeting Notes, Docs, and a Team Directory to centralize information, track progress, and document decisions effectively.
To set up a database, create a new page and choose a layout such as Table, Board, Calendar, Timeline, or Gallery. You might consider using the "One Big Database" approach for shared documents rather than scattering smaller databases throughout your workspace. This method promotes clarity and makes it easy for team members to filter and find what they need.
For example, in your Projects database, include properties like Status, Owner, Due Date, and Priority. Link this database to your Tasks database so every task is tied to a specific project. Similarly, your Meeting Notes database should capture important details like Date, Attendees, and Action Items.
To maintain consistency, create templates for recurring items such as weekly syncs, client check-ins, or product specs. Add multiple views to each database:
Use Board view to track workflow stages.
Try Timeline view for visualizing project durations and overlaps.
Use Calendar view to manage schedules and deadlines.
This approach ensures your databases are both functional and easy to navigate.
Connect Databases Together
Linking your databases is key to keeping everything connected and efficient. Use relation properties to tie databases together - for instance, linking the Tasks database to the Projects database so every task is associated with a specific project. Add rollups to track progress, like showing the percentage of tasks completed for each project. This keeps your dashboards updated in real time.
You can also use linked views to display the same database in different places without duplicating data. For example, place a master Tasks database on a central page, then add filtered linked views in each department's teamspace to show only their relevant tasks. This setup ensures that any updates made in one view are reflected everywhere, creating a single, reliable source of truth for your entire organization.
Step 3: Customize Your Workspace
Create Your Dashboards
Design a Company Homepage that brings together project updates, KPIs, and essential resources in one place. Spencer Lanoue from Bricks describes it perfectly:
A great company dashboard is like a central nervous system for your team, keeping everyone aligned, informed, and focused on what matters most.
Use column layouts - like /2 columns or /3 columns - to organize content and minimize scrolling. Add callout blocks to highlight your company mission or key quarterly goals, and synced blocks to ensure shared details stay consistent across pages.
Incorporate linked database views with filters to display only the most pressing tasks or deadlines. For example, try Board view for workflow tracking, Calendar view for scheduling, or Gallery view for showcasing your team directory. To keep things tidy, group related documentation into toggle lists under sections like "Quick Links" or "Company Resources."
When you're ready to streamline further, take advantage of pre-built templates to speed up your setup.
Use Ready-Made Templates
Sentele offers a variety of templates to jumpstart your workspace. The Sales Manager template ($79) features an automated sales pipeline and KPI tracking, while the Marketing Manager template ($79) provides a full marketing hub. For a broader approach, the Business Bundle ($199) includes all eight premium templates, covering areas like HR, Finance, Operations, and Project Management.
Tailor these templates to fit your team's specific workflows and compliance needs. Keep your process simple by focusing only on database properties that add meaningful context. Notion consultant Matthias Frank offers this advice:
It's easy to go overboard and try to track everything. But at the end of the day, someone somewhere has to fill out that property for it to actually be helpful.
Improve Workspace Navigation
Your sidebar is your workspace's roadmap, so keep it clean and intuitive. Limit top-level pages to major departments or company-wide resources, and encourage team members to favorite frequently used pages for easy access.
Use consistent icons for your main databases and toggles to organize sub-pages, ensuring smooth navigation. To avoid clutter, move outdated projects to a dedicated "Archive" page.
For larger teams, enabling page verification in wikis is a smart way to ensure content stays accurate and up-to-date. This feature marks verified pages clearly, helping everyone stay on the same page - literally.
Step 4: Secure and Test Your Workspace
Lock Important Pages and Templates
Protecting key pages in your Notion workspace is crucial. Assign appropriate permissions to ensure that sensitive documents, like mission statements or benefits information, are accessible only to the right people. Notion provides four access levels: Full, Can edit, Can comment, and Can view. For most users, set permissions to Can view on critical documents, while reserving Full access for HR or leadership.
For databases, use the "Can edit content" permission. This allows team members to update entries without modifying the database structure, such as filters or property settings.
If you're using the Enterprise plan, you can take security a step further. Use advanced settings to disable page exports, block duplication to other workspaces, and restrict publishing pages to the web or inviting external guests. Once your key pages are locked down, move on to testing your setup.
Test Your Workflows
Before rolling out your workspace, take the time to verify everything works as intended. Check that each database, view, and connection functions correctly. Whether it's a Board, Table, Calendar, or Gallery view, ensure filters and sorting meet the needs of each team. Test integrations like Slack notifications and synced databases to confirm they provide real-time updates.
Assign owners to critical pages and ensure all content is up-to-date. If you're on the Enterprise plan, review the Audit Log to track configuration changes and double-check that your security settings are intact.
For example, in March 2025, the financial intelligence startup Puzzle adopted a "Single Source of Truth" approach using Notion for their 50+ employees. By integrating tools like Linear and Slack into Notion and leveraging Notion AI for internal queries, they saved over 21 hours per week. Their testing process included structured "Request for Comment" documents, which shifted decision-making from meetings to asynchronous updates, drastically reducing their meeting load.
CEO Sasha Orloff highlighted the importance of this approach:
"If it's not in writing, it didn't happen. In our case, if it's not in Notion, it doesn't exist." - Sasha Orloff, Puzzle
Once your workflows are running smoothly, the next step is to prepare your team for success.
Train Your Team
Help your team get up to speed by directing them to Notion Academy. This platform offers curated learning paths, like the "Essentials Path" and "Workflows Path", designed to guide new users. You can also create a centralized onboarding page within your workspace. Include resource galleries, tutorial videos, and step-by-step guides tailored to your company's setup.
Start by introducing Notion's modular blocks - text, images, databases - and show how they can be customized for various workflows. Use live examples, like moving a project card on a Kanban board or applying a database template, to make the training practical and relatable. Encourage team members to experiment in the Private section of their sidebar, so they can explore features without impacting shared data.
Make sure everyone understands their roles and permissions by explaining the differences between Workspace Owners, Membership Admins, Members, and Guests. Reinforce collaboration best practices by demonstrating tools like @ mentions for tagging, inline comments for detailed feedback, and page-level comments for broader discussions. Finally, set up feedback channels where team members can suggest workflow improvements or request changes to security settings.
When your team feels confident using the workspace, you'll see improvements in both security and efficiency.
Step 5: Maintain and Grow Your Workspace
Review Your Workspace Regularly
Once your workspace is set up and running smoothly, keeping it efficient over time requires regular reviews. Assign ownership for pages and databases to specific team members, and use tools like Page Verification to ensure all information stays up-to-date. Keep an eye on the "Recently Left" members log to transfer private pages from former employees to active team members within 30 days. To keep things tidy, nest pages within the correct teamspaces and update database templates as your team discovers better workflows.
Dive into workspace analytics to understand which pages are frequently visited and which are ignored. This data can guide you in refining your setup. Notion also provides database backups for the last 30 days, acting as a safeguard if anything goes wrong. Regularly check the "What's new" page to take advantage of the latest features and incorporate them into your workflows.
As your workspace becomes more stable, start thinking ahead. Adjust your organizational structures to accommodate team growth and evolving needs.
Scale as Your Business Grows
When your team expands, it’s time to move beyond a single "General" teamspace. Create dedicated spaces for different departments to keep information organized and relevant. Use User Groups to manage permissions more efficiently. Consider building a centralized "Backend" page to store your original databases, which helps declutter your sidebar while providing users with curated dashboards. Leverage "Person" properties with "Me" filters to create personalized task views for team members. Frances Odera Matthews, Founder of The Notion Bar, highlights this flexibility:
"Notion allows you to tailor-make a platform that fits and scales with your specific needs."
For new hires, enable Allowed Email Domains so they can automatically join your workspace using their company email addresses. If you’re working in a larger organization, the Business or Enterprise plans offer additional tools like SAML SSO for streamlined access management and enhanced security. On Enterprise plans, you can even lock the sidebar architecture to maintain consistency as your team grows.
Use Sentele's Updates and Support
Sentele’s templates are designed to grow with your business, offering unlimited free updates to ensure your workspace remains aligned with best practices. Each template includes setup documentation and ongoing support, integrating Notion's updates and workflow improvements. Assign ownership to key pages and use Synced Blocks for company-wide information, like goals or contact details, so updates automatically reflect across the workspace. Set up feedback channels to let team members suggest improvements to templates or workspace policies. This continuous feedback loop ensures your Notion setup evolves alongside your business, rather than becoming outdated.
For $199, Sentele’s Business Bundle gives you access to eight premium templates, covering a wide range of needs to support your growing organization. It’s a comprehensive toolkit to keep your workspace running smoothly as you scale.
Ultimate Notion For Business Setup Guide in 2024
Conclusion
Creating your central operating system in Notion is a journey, not a one-time task. By using this checklist, you’re setting up a Single Source of Truth where every team member can easily locate information, contribute to projects, and see how their work ties into the company’s bigger picture.
Think of your workspace as a living system that adapts as your business grows. Begin with the basics - well-organized team spaces, linked databases, and straightforward workflows. Then, fine-tune the setup based on how your team interacts with it. Assign ownership for pages, monitor analytics regularly, and take advantage of new features as Notion rolls them out. This approach keeps your workspace relevant and sets the stage for long-term growth and productivity.
FAQs
Which Notion plan is best for my business?
Choosing the right Notion plan boils down to understanding your team size, the features you need, and your budget. Here's a breakdown to help you make the best choice:
Free Plan: Great for individuals or small teams exploring basic tools like note-taking, databases, and simple collaboration features. A solid starting point for anyone new to Notion.
Plus Plan ($10 per member/month): Suited for small teams (2-10 people) that need unlimited file uploads, shared calendars, and more advanced database capabilities.
Business Plan ($18 per member/month): Tailored for growing teams (10+ members) that require access to full AI features, custom workflows, and enhanced permission controls.
Enterprise Plan: Built for large organizations, this plan offers enterprise-level security, admin controls, and compliance tools. Pricing is customized to your needs.
If you're just starting out, the free plan is a no-brainer. As your needs evolve - whether it's scaling your team, managing workflows, or prioritizing security - you can upgrade to a plan that fits your goals and budget.
What are the best ways to organize teamspaces and databases in Notion for business use?
To keep your Notion workspace running smoothly, start by setting up a central homepage for your company. Think of this as the main navigation hub where everything important is just a click away. Next, create dedicated teamspaces for each department - like Sales, Marketing, or Product - so every team has its own organized space. Keep your sidebar tidy by grouping related pages under clear headings and using simple, intuitive names that make it easy to find what you need. For larger teams, Notion’s permissions settings let you control who sees what, ensuring sensitive info stays private while still allowing collaboration.
When it comes to databases, picture them as digital filing cabinets for your workspace. Use templates to keep new entries consistent and set up key properties like status, owner, and due date to track important details. Take advantage of multiple database views - like a Table for detailed data, a Board for tracking tasks, or a Calendar for managing deadlines. Save filtered views to show only the most relevant info for each team. To make your workflows more efficient, link related databases (such as connecting projects to clients) and use consistent tags or labels to keep everything organized. Don’t forget to regularly review and tidy up your databases by removing unused fields to keep your system clean and easy to scale.
How do I keep my Notion workspace secure and up-to-date?
To ensure your Notion workspace stays secure, start by fine-tuning your security settings. Disable the “Share to web” feature to block public access, and remove any unnecessary guest permissions. For added safety, enable single sign-on (SSO) with your corporate identity provider, which helps minimize risks tied to passwords. If you're using an Enterprise plan, think about integrating data loss prevention (DLP) tools or security information and event management (SIEM) systems to keep an eye on sensitive information. Regularly review your audit log and schedule workspace exports to maintain secure backups and an untampered activity record.
Keep your workspace updated by running the latest version of Notion and enabling automatic updates on all your devices. Make it a habit to periodically review your allowed email domains and member list, removing any inactive accounts. Performing a quarterly export of your workspace and checking your security settings regularly will help create a safer and more reliable environment for your team.
Ritesh Nayak
Ritesh Nayak
Ritesh Nayak
Ritesh Nayak
Ritesh Nayak